How to stop your Wi-Fi from being a daily frustration
Configuring a solid RF profile is one of those things that makes or breaks your wireless network. Do it properly, and everything works smoothly. Get it wrong, and you’re stuck dealing with slow speeds, dodgy roaming, and constant complaints from users who still think the Wi-Fi “just works” like magic.
So, let’s break it down, take a realistic approach (none of that ‘just enable everything and hope for the best’), and build the perfect Cisco Meraki RF profile using best practices.
RF Profile Overview – Why You Actually Need One
First off, what even is an RF profile?
Think of it as a preconfigured set of rules that control how your Meraki APs behave, from which channels they use to how they handle clients. Instead of tweaking settings AP by AP (which is painful), you apply one profile across multiple APs for consistency and much less faff.
A well-built RF profile ensures:
✅ Strong, consistent coverage (no weird Wi-Fi black holes).
✅ Efficient channel use (your APs aren’t fighting each other for airtime).
✅ Devices connect properly (no clinging to an AP from the other side of the building).
✅ Less troubleshooting (because you actually set it up correctly from the start).
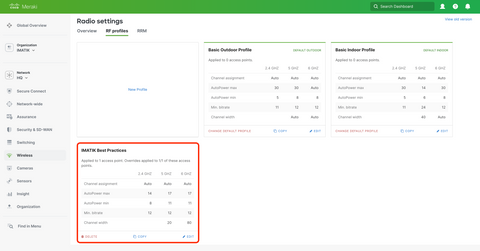
Right, now let’s get into how we’ve set ours up in the Meraki Dashboard.

General SSID Configuration Options – Keep It Simple
Too many SSIDs = bad Wi-Fi. Each one adds overhead, increasing management frames and slowing everything down. Keep it lean.
🔹 No more than 5 SSIDs per band – Any more and you’re wasting airtime.
🔹 Use unique names per frequency – Call them something obvious like “Office-5GHz” and “Office-6GHz” so devices don’t stubbornly sit on 2.4 GHz.
🔹 Avoid hidden SSIDs – They don’t make your network more secure, just harder to connect to.
✅ In Meraki Dashboard: We’ve set business-critical SSIDs to 5 GHz and 6 GHz only, leaving 2.4 GHz for devices that really need it (if any).

Flex Radio Configuration – Getting the Most Out of Your APs
Different Meraki APs have flexible radio settings, meaning you can customise how they use their radios depending on your environment.
If you don’t need 2.4 GHz (and let’s be honest, it’s mostly for IoT and legacy devices), switch a radio to dual 5 GHz mode instead. This allows more capacity for modern devices that can make use of it.
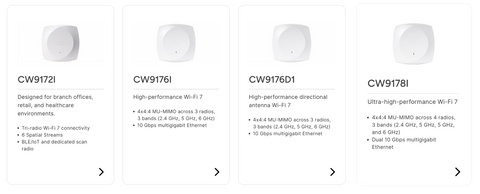
✅ In Meraki Dashboard: We’ve set up APs like the CW9166 and CW9178 to run dual 5 GHz mode where needed, ensuring better performance for enterprise devices.
💡 When should you keep 2.4 GHz?
-
If you have IoT devices (they love 2.4 GHz).
-
If you’re unsure what your guests' devices will support, 2.4 GHz can help with connecting older legacy devices.

MBR (Minimum Basic Rate), Client Balancing, and Enabling 802.11be (Wi-Fi 7)
Minimum Basic Rate (MBR) forces clients to connect at a reasonable speed instead of dragging everyone else down.
🔹 Set MBR to 12 Mbps (low density) or 24 Mbps (high density) – This stops devices from clinging onto an AP they should have roamed away from ages ago.
🔹 Disable anything below MBR – This stops slow devices from wrecking airtime efficiency.
✅ Client Balancing: Ensures users get spread across multiple APs instead of dogpiling one while the others do nothing.
✅ 802.11be (Wi-Fi 7) enabled – If you have Wi-Fi 7 APs, make sure they’re running in 802.11be mode to unlock all those shiny new features like Multi-Link Operation (MLO).
2.4 GHz Settings
2.4 GHz is like the old, reliable car you only drive when necessary. It’s useful, but crowded, so use it wisely.
🔹 Channel width: Always 20 MHz – Anything wider and you’re asking for interference.
🔹 Channel selection: Stick to 1, 6, and 11 (avoid overlapping mess).
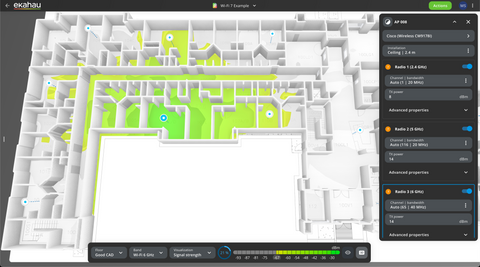
🔹 Power settings: Keep it low to prevent bleeding into other APs’ coverage. We typically set a range of between 8-14 dBm in Meraki, this helps to keep cell sizes similar to the other bands, whilst also reflecting what transmit power we used in our Ekahau design and giving the AI RRM the flexibility to make some adjustments based on environmental factors.
✅ In Meraki Dashboard: We’ve restricted 2.4 GHz to only the SSIDs that actually need it (no reason for your work laptops to be on this band in 2025).

5 GHz Settings
5 GHz is where most of your devices will connect, so we need to make sure it’s running at peak efficiency.
🔹 Channel width:
-
20 MHz for high-density environments (best for offices, schools, hospitals).
-
40 MHz for lower-density environments where you can afford wider channels.
🔹 Power settings: Keep it in check too high and APs start interfering with each other. We typically set a range of between 11-17 dBm in Meraki, this is to reflect what transmit power we used in our Ekahau design and giving the AI RRM the flexibility to make some adjustments based on environmental factors.
✅ In Meraki Dashboard: We’ve limited channel widths based on density and ensured DFS channels are enabled to make use of extra bandwidth (where available).

6 GHz Settings
If your APs support 6 GHz, you absolutely should be using it. It’s fast, uncongested, and offers low latency.
🔹 Channel width:
-
80 MHz if you have the full 1.2 GHz spectrum.
-
20/40 MHz if you only have 500 MHz or less.
🔹 Channel selection: Use all available channels where possible to maximize capacity.
🔹 Power settings: Keep it in check too high and APs start interfering with each other. We typically set a range of between 11-17 dBm in Meraki, this is to reflect what transmit power we used in our Ekahau design and giving the AI RRM the flexibility to make some adjustments based on environmental factors.
✅ In Meraki Dashboard: We’ve prioritised 6 GHz for business-critical SSIDs and adjusted channel widths based on regional availability.
💡 Pro Tip: Not all client devices support 6 GHz yet so don’t panic if some devices still connect on 5 GHz.

Bonus Tip – Don’t Forget to Apply Your RF Profiles!
You’d be surprised how many people spend hours configuring the perfect RF profile… and then forget to apply it to their APs.
✅ In Meraki Dashboard: We’ve assigned the RF profile to all APs in their respective areas, ensuring consistency across the network.
Final Reminder:
✔️ Check that the right APs have the correct RF profile.
✔️ Monitor performance in the Meraki Dashboard to spot any issues.
✔️ Run an Ekahau post-deployment survey to verify coverage.

Wrapping Up – Your Wi-Fi Shouldn’t Be an Afterthought
If your Meraki Wi-Fi is slow, congested, or unreliable, chances are your RF settings need work. Following these best practices ensures:
✅ Better coverage & performance.
✅ Fewer client complaints.
✅ More efficient channel & power management.
✅ Your Wi-Fi network is actually being used properly.
Got questions or need help fine-tuning your setup? Drop us a message we love a good Wi-Fi optimisation challenge! 🚀